When I first took a bite of this delightful Bread of the Dead, I was instantly transported by its sweet aroma and soft, fluffy texture. Each mouthful is a gorgeous blend of crispy edges, tender centers, and a hint of citrus that dances on your palate, making it impossible to resist. This traditional Mexican sweet bread, often made to celebrate the Day of the Dead, not only satisfies your cravings but also packs a punch with about 350 calories—an indulgent treat that doesn’t skimp on flavor or joy. I created this recipe as a way to bring my family together during our busy weeks while honoring our cultural traditions.
I’ll never forget the first time I made Bread of the Dead for my family; it was a warm autumn afternoon, and the kids had just come home from school. As the sweet scent filled our kitchen, my youngest exclaimed, “It smells like a party in here!” When I finally served it up, with its unique twist of orange zest that sets it apart from other sweet breads, my mother couldn’t help but ask for seconds. It felt so rewarding to see their smiles and hear them rave about how delicious it was; it turned what could have been just another day into something special that we still talk about today.
Everything You Need to Make Bread of the Dead
Each ingredient in this dish plays an essential role in flavor and texture. Here’s what you’ll need:
- 4 cups all-purpose flour (plus extra for dusting): Provides the structure and base for the bread’s delightful texture.
- 1 cup granulated sugar: Adds sweetness, balancing the rich flavors and enhancing the bread’s golden crust.
- 1 tablespoon active dry yeast: Essential for leavening, helping the dough rise and creating a light, airy crumb.
- 1 teaspoon salt: Enhances all the flavors and helps control yeast activity for better fermentation.
- 1 cup milk (warm): Contributes moisture and richness while activating the yeast for optimal rise.
- 1/2 cup unsalted butter (melted): Adds richness and a tender crumb, contributing to the bread’s decadent flavor.
- 3 large eggs: Provide structure, moisture, and richness, helping bind everything together beautifully.
- 1 tablespoon orange zest: Infuses a bright citrus aroma that complements the sweet notes of the bread.
- 1 teaspoon anise seeds: Offers a subtle licorice flavor that adds a unique depth to this traditional recipe.
— Topping Ingredients —
- 1 egg egg wash (beaten): Creates a glossy finish on the bread, enhancing its visual appeal.
- 1/4 cup granulated sugar (for sprinkling): Adds a sweet crunch to the crust, making each bite irresistible.
- 1 tablespoon orange zest (for garnish): Brightens the presentation with a pop of color and aromatic freshness.
Step-by-Step Instructions
I recommend starting with the yeast and warm milk first, as it takes a few minutes to froth and will ensure your bread rises nicely while you prepare the other ingredients.
Step 1: In a mixing bowl, combine the warm milk and active dry yeast, making sure the milk is not too hot or it can kill the yeast. Let this mixture sit for about 5 minutes until it becomes frothy; this indicates that your yeast is active and ready to help your dough rise. While waiting, you can gather the rest of your ingredients and tools, so you’re set up for success.
Step 2: In another bowl, whisk together the all-purpose flour, granulated sugar, salt, orange zest, and anise seeds. This step is important because it evenly distributes the dry ingredients and adds aromatic flavors to your dough. If you prefer a more pronounced anise flavor, feel free to adjust the amount slightly based on your taste preferences.
Step 3: Now that your yeast mixture is frothy, add in the melted butter and eggs before combining this with your dry ingredient mixture. Stir until everything is well incorporated; I find using a wooden spoon really helps bring everything together without overworking it. The moisture from the eggs and butter will enrich the dough beautifully.
Step 4: Transfer the dough onto a floured surface and knead it for about 10 minutes until it’s smooth and elastic. This step builds serious flavor and structure in your bread, so don’t rush! If you find the dough sticking to your hands or work surface, sprinkle a little extra flour as needed—but be careful not to add too much!
Step 5: Place the kneaded dough in a greased bowl, cover it with a cloth, and let it rise in a warm place for about 1 hour or until doubled in size. This is crucial for achieving that light texture we love in sweet breads like this one. I usually turn my oven on low for just a minute to create a cozy environment for rising—just make sure to turn it off before putting the dough inside!
Step 6: Preheat your oven to 350°F (175°C) during the last few minutes of rising so it’s hot and ready when you’re done shaping your loaf. A properly preheated oven ensures even baking throughout; trust me, you’ll want that lovely golden crust!
Step 7: Once risen, punch down the dough gently to release any air bubbles that have formed. Shape it into a round loaf; I recommend keeping it uniform in thickness for even baking later on. The process of shaping gives you an opportunity to work out some stress too—who doesn’t love kneading bread?
Step 8: Place your shaped loaf on a baking sheet lined with parchment paper; this prevents sticking and makes cleanup easier later on. If you have any remaining flour from dusting earlier, use that sparingly here as well—it helps create that perfect base for baking without adding excess flour into your final product.
Step 9: For decoration, take a small piece of dough from what you’ve shaped into the loaf and form it into bones or skulls—this traditional touch adds both flair and fun to your Bread of the Dead! Place these decorative shapes carefully on top of your loaf to create visual interest; my family loves getting creative with this part!
Step 10: Brush the entire loaf generously with an egg wash made from beating one egg; this creates that beautiful glossy finish when baked. Then sprinkle granulated sugar over the top—it adds sweetness and a delightful crunch once baked! I suggest being generous but ensuring it’s evenly distributed so every bite has that sugary goodness.
Step 11: Bake in your preheated oven for about 25 minutes or until golden brown; you’ll know it’s done when you see a rich golden crust forming on top. Keep an eye on it as baking times can vary slightly depending on individual ovens—trust me when I say nothing beats that fresh-baked aroma filling your kitchen!
Step 12: Once done baking, let your Bread of the Dead cool slightly before serving; garnishing with additional orange zest at this stage brightens up both flavor and presentation beautifully! Enjoy sharing this cultural treat with family or friends while celebrating traditions—it’s always a hit at gatherings!
What to Serve with Bread of the Dead
This dish is already incredibly filling and balanced, but these sides add extra variety and nutrition to round out your meal perfectly.
Citrus Avocado Salad: This refreshing salad features creamy avocado, zesty lime juice, and a sprinkle of cilantro, offering a bright contrast to the sweetness of the Bread of the Dead. The healthy fats from the avocado provide essential nutrients, promoting heart health while keeping you satisfied. It’s a staple in our household, especially when we want a light yet flavorful side that complements festive meals.
Mexican Rice: Fluffy rice cooked with tomatoes, onions, and spices brings a hearty element to your table while echoing the warm flavors of the bread. This side adds an additional 4–5 grams of protein per serving when combined with beans or chicken, making it great for post-workout recovery. My kids love it as a filling addition to any dinner!
Black Bean Salsa: A mix of black beans, red onion, cilantro, and lime juice creates a vibrant salsa that not only enhances the meal’s color but also packs in fiber and protein. This dish provides about 7 grams of protein per serving and contrasts beautifully with the sweet notes of the bread. It’s my go-to for meal prepping since it stays fresh for days.
Anise-Spiced Sweet Potatoes: Roasted sweet potatoes seasoned with anise seeds reflect the subtle flavor profile of the Bread of the Dead while adding a delightful texture. Their natural sweetness pairs wonderfully with the bread’s sugary crust, offering around 20 grams of carbohydrates per serving for those needing extra energy. I often prepare these on weekends for easy reheating during busy weekdays.
Pico de Gallo: Fresh diced tomatoes, onions, jalapeños, and cilantro mixed together create a zesty pico de gallo that adds crunch and brightness to your meal. Its acidity balances out the richness of the bread while offering vitamins A and C—beneficial for overall health. We always keep some on hand as it’s perfect for dipping or topping just about anything!
Storage & Serving Tips

To store your Bread of the Dead for meal prep, let it cool completely before placing it in an airtight container. Store the bread in the fridge for up to 4 days. If you want to keep the flavors fresh, consider separating the toppings: place the beaten egg wash and granulated sugar for sprinkling in small containers, and store the additional orange zest separately to maintain its vibrant aroma.
When reheating, slice the bread and put it in a preheated oven at 350°F for about 5–7 minutes until warmed through. This method will help retain its soft texture. Avoid microwaving, as it can make the bread chewy and unappetizing. If you’ve stored the toppings separately, add them just before serving for a fresh touch.
Pro tip: To batch cook this recipe for the week, double the ingredients and portion the bread into individual containers after cooling. Family members can self-assemble their own portions by adding toppings like extra orange zest or a sprinkle of sugar as desired. For variety, consider swapping out some of the all-purpose flour with whole wheat flour or adding spices like cinnamon to different batches. To keep your bread at its best during meal prep storage, always add any citrus zest fresh when serving to enhance flavor.
Conclusion
This Bread of the Dead has become a regular rotation recipe for me, and I find myself making it at least twice a month because it’s not only delicious but also packs 350 calories of pure comfort. The unique touch of orange zest combined with anise seeds truly sets this sweet bread apart from other baked goods, giving it that authentic flavor that celebrates tradition. Give this one a try this week. I promise it’ll become a regular in your house too.
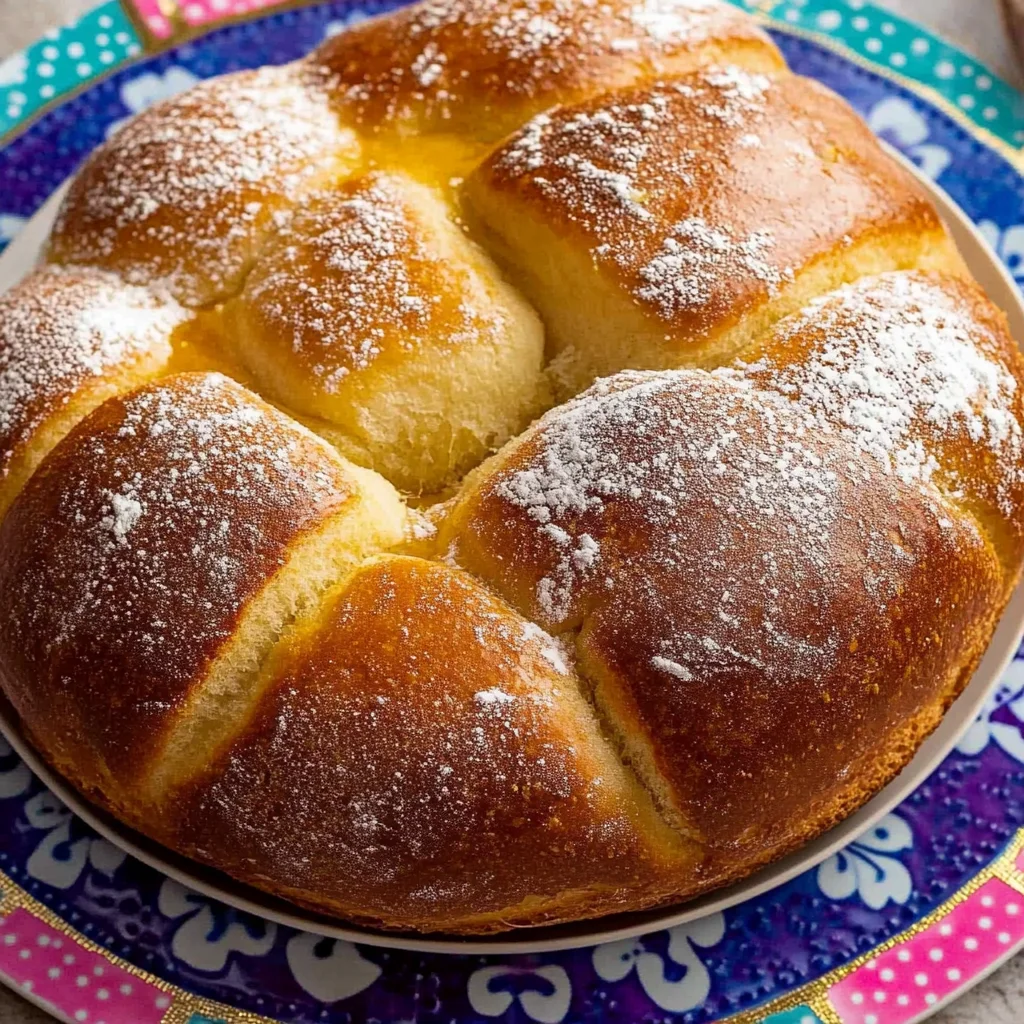
Bread of the Dead
Ingredients
Method
- In a mixing bowl, combine warm milk and yeast. Let it sit for 5 minutes until frothy.
- In another bowl, whisk together flour, sugar, salt, orange zest, and anise seeds.
- Add melted butter and eggs to the yeast mixture, then combine with the dry ingredients.
- Knead the dough on a floured surface for about 10 minutes until smooth.
- Place the dough in a greased bowl, cover with a cloth, and let it rise for 1 hour or until doubled in size.
- Preheat the oven to 350°F (175°C).
- Once risen, punch down the dough and shape it into a round loaf.
- Place the shaped dough on a baking sheet lined with parchment paper.
- For decoration, take a small piece of dough, shape it into bones or skulls, and place on top.
- Brush the loaf with egg wash and sprinkle with sugar.
- Bake for 25 minutes or until golden brown.
- Let cool before serving, garnished with additional orange zest if desired.


Leave a Comment