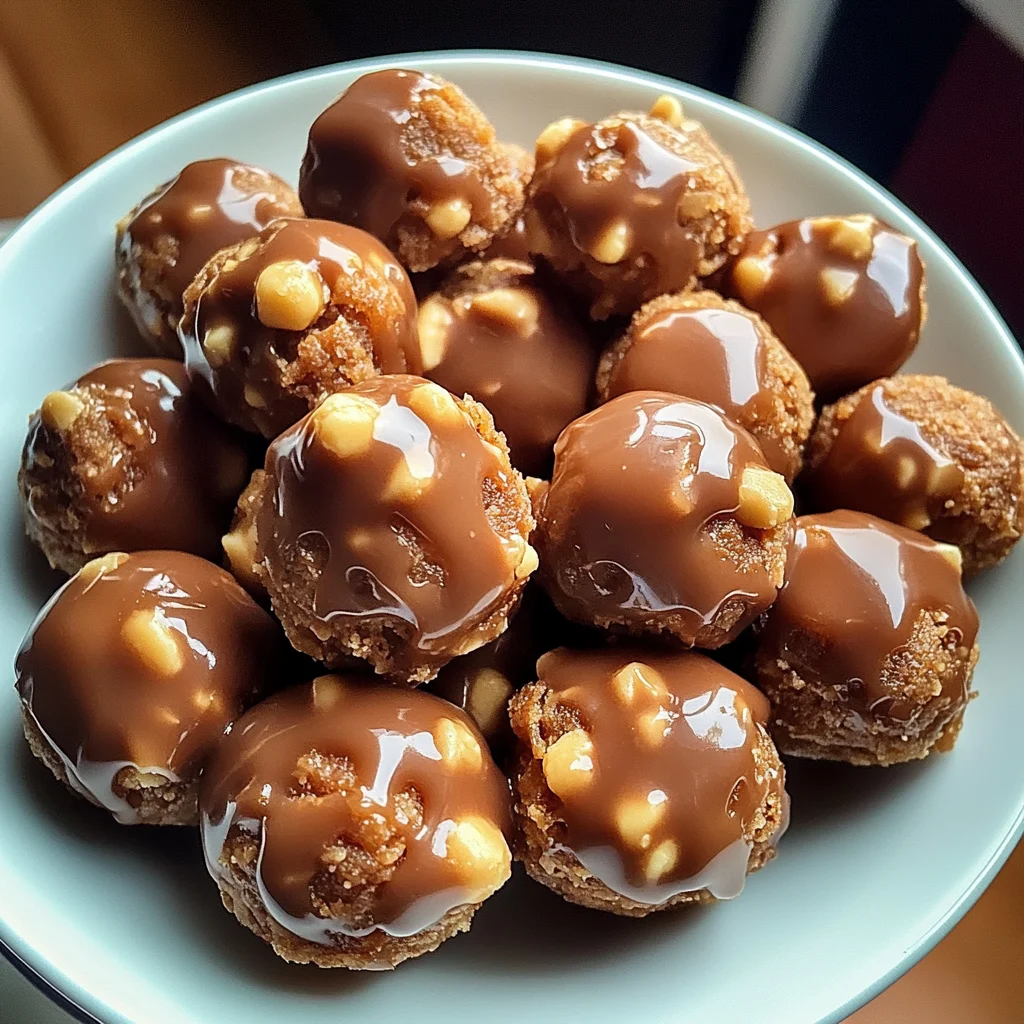
There’s nothing quite like the flavor explosion of these Butterfinger Balls—sweet, crunchy, and decadently rich! With each bite, you’ll experience a delightful combination of crispy peanut butter and buttery chocolate that’s not only indulgent but also packs a punch with around 150 calories each. I created this recipe as a quick no-bake treat for those busy weekdays when my family craved something sweet but still needed a bit of protein to keep our energy up. Perfect for meal prepping, these treats are an ideal way to satisfy your cravings while sneaking in some nutrition.
I vividly remember the first time I made Butterfinger Balls for my family. It was a rainy Saturday afternoon, and my teenagers were lounging around the house feeling a bit restless. I decided to whip up these treats on a whim, hoping to lift their spirits. As soon as they took their first bites, I heard my son exclaim, “Mom, these are amazing! Can we have them every week?” The magic ingredient that sets these apart is the crushed Butterfinger bars; they add an irresistible crunch that has everyone coming back for seconds!
What You’ll Need for Butterfinger Balls
Each ingredient in this dish plays an essential role in flavor and texture. Here’s what you’ll need:
4 bars Butterfinger candy bars (crushed): These provide a sweet, crunchy base that defines the treat’s signature taste.
1 cup peanut butter (creamy): Adds rich creaminess and binds the ingredients together for a perfect consistency.
1 cup powdered sugar: Sweetens the mixture and helps achieve a smooth, melt-in-your-mouth texture.
1 teaspoon vanilla extract: Enhances the overall flavor profile with a warm, aromatic note.
1 cup chocolate chips (semi-sweet): Coats the balls in luscious chocolate for a delightful contrast to the filling.
1 teaspoon coconut oil (optional for smoothness): Helps to create a glossy finish and makes the chocolate coating easier to work with.
Step-by-Step Instructions
I recommend starting with the Butterfinger mixture first, as it needs to be rolled into balls before the chocolate can be melted, ensuring everything flows smoothly.
Step 1: In a mixing bowl, combine the crushed Butterfinger bars, creamy peanut butter, powdered sugar, and vanilla extract. Use a sturdy spatula or spoon to mix these ingredients together until they are well combined and form a cohesive mixture. This step is crucial because it gives your Butterfinger balls that delicious flavor and texture. If the mixture feels too sticky to handle, you can lightly grease your hands with a bit of peanut butter for easier rolling.
Step 2: Once your mixture is ready, roll it into small balls about 1 inch in diameter. Place each ball on a baking sheet lined with parchment paper to prevent sticking. You should aim for uniformity in size to ensure even coating later on. I usually find that making 15 balls from this recipe works perfectly; however, feel free to adjust the size based on your preference for bite-sized treats.
Step 3: Now it’s time to melt the chocolate! In a microwave-safe bowl, combine the semi-sweet chocolate chips and coconut oil if you’re using it. Microwave the mixture in 30-second intervals, stirring between each interval until the chocolate is fully melted and smooth—this usually takes about 1-2 minutes total. Keeping an eye on it will prevent burning; you want it glossy and fluid for easy dipping.
Step 4: Dip each Butterfinger ball into the melted chocolate using a fork, ensuring that it’s fully coated. Gently lift it out and let any excess chocolate drip back into the bowl before placing it back on the parchment-lined baking sheet. This method not only gives them a beautiful finish but also avoids clumping of chocolate at the bottom. If you’re careful with this step, you’ll end up with perfectly coated treats!
Step 5: Return all your coated Butterfinger balls to the parchment-lined baking sheet and refrigerate them for about 30 minutes, or until the chocolate is set and firm to touch. This chilling step is essential for achieving that satisfying crunch when you take a bite; plus, it makes them easier to handle without smudging the chocolate coating.
Step 6: Once chilled and set, serve your delicious Butterfinger balls straight from the fridge! These treats are best enjoyed cold as they offer a wonderful contrast between creamy filling and crunchy coating. I love serving them at parties or keeping them handy for snacks throughout the week—they’re always a hit!
What to Serve with Butterfinger Balls
This dish is already incredibly filling and balanced, but these sides add extra variety and nutrition to round out your meal perfectly.
Fresh Spinach Salad with Balsamic Vinaigrette: A simple salad made with fresh spinach, cherry tomatoes, red onion, and a tangy balsamic vinaigrette provides a refreshing contrast to the rich sweetness of the Butterfinger Balls. The greens offer vital vitamins A and C, plus fiber, which can help balance the sugar content in the dessert. My kids love to add sliced almonds for an extra crunch and a boost of healthy fats.
Coconut Quinoa: Fluffy quinoa cooked in coconut milk adds a subtle sweetness that complements the flavors of the Butterfinger Balls while providing an excellent source of protein—about 8 grams per cup. The nutty taste and chewy texture make it a satisfying side that rounds out the meal nicely. I often prepare a big batch on Sundays for quick meal prep throughout the week.
Guacamole with Whole Wheat Tortilla Chips: Creamy guacamole seasoned with lime and garlic not only adds a burst of flavor but also brings healthy fats to the table, making it a perfect complement to the rich chocolate and peanut butter in Butterfinger Balls. With around 3 grams of protein per serving, this dip is also great for satisfying cravings while providing essential nutrients. It’s my go-to when hosting friends for movie night!
Sweet Potato Wedges: Roasted sweet potato wedges tossed in olive oil and paprika offer a sweet-savory flavor profile that echoes the candy’s richness while adding fiber and vitamins A and C—around 4 grams of protein per serving! My family loves these as a comforting side dish during our cozy evenings at home, balancing out indulgent treats like Butterfinger Balls perfectly.
Storage & Serving Tips

To store your Butterfinger Balls effectively, place them in an airtight container and keep them in the fridge, where they will stay fresh for up to one week. For optimal texture, it’s best to store the — Butterfinger Mixture — (crushed Butterfinger candy bars, peanut butter, powdered sugar, and vanilla extract) separately from the — Chocolate Coating — (chocolate chips and coconut oil). You can keep the mixture in one container and the chocolate coating in another; this will help maintain the integrity of both components.
When it comes to reheating, it’s important to note that these treats are best enjoyed cold or at room temperature. If you want to melt the chocolate coating slightly for a softer bite, use a microwave on low for 10-15 seconds at a time until just warm; however, avoid overheating as this can lead to a disappointing texture. Microwaving the entire Butterfinger Balls can make them too soft and lose their delightful crunch. Instead, serve them chilled straight from the fridge for maximum enjoyment.
Pro tip: Batch cooking is a fantastic way to keep these treats on hand throughout the week—consider doubling the recipe on Sunday and portioning them into individual containers. Family members can easily self-assemble their own bowls by mixing different parts together. For variety, swap out semi-sweet chocolate chips for milk chocolate or dark chocolate for different flavor profiles. To keep your — Butterfinger Mixture — fresh during meal prep storage, consider adding a touch of extra peanut butter right before serving to enhance creaminess while ensuring each bite remains deliciously decadent.
Conclusion
These Butterfinger Balls have become one of those recipes I make at least once a week because they’re not only delicious but also pack 150 calories of sweet satisfaction in every bite. The creamy peanut butter combined with the crushed Butterfinger bars creates a unique texture and flavor that sets these treats apart from typical no-bake desserts. Give this one a try this week. I promise it’ll become a regular rotation treat in your house too.
Butterfinger Balls
Ingredients
Method
- In a mixing bowl, combine the crushed Butterfinger bars, peanut butter, powdered sugar, and vanilla extract. Mix until well combined.
- Roll the mixture into small balls, about 1 inch in diameter, and place them on a baking sheet lined with parchment paper.
- In a microwave-safe bowl, combine the chocolate chips and coconut oil. Microwave in 30-second intervals, stirring in between, until melted and smooth.
- Dip each Butterfinger ball into the melted chocolate, ensuring it is fully coated. Use a fork to lift it out and let excess chocolate drip off.
- Return the coated balls to the parchment-lined baking sheet.
- Refrigerate the chocolate-coated Butterfinger balls for about 30 minutes, or until the chocolate is set.
- Serve chilled and enjoy your delicious Butterfinger balls!
Leave a Comment