There’s nothing quite like the explosion of flavors in Italian Grinder Sliders to get your taste buds dancing! These mini sandwiches are a symphony of crispy, savory, fresh, and loaded with protein, making them an irresistible choice for any gathering. I created this recipe during a particularly busy week when I was scrambling for something quick yet satisfying that could please my whole family. With around 250 calories per slider and packed with layers of delicious Italian meats and cheeses, they’re not only tasty but also a great source of protein to fuel our days.
I remember the first time I served these sliders; it was game day, and my teenagers were glued to the TV while I tried to whip up something special. As I pulled the sliders from the oven, my youngest exclaimed, “Wow, Mom, these look amazing!” The key twist that sets my Italian Grinder Sliders apart is the tangy zesty dressing that ties all those rich flavors together perfectly. Watching them devour every last bite and then hear my oldest ask if we could make them again next week truly made my day!
Ingredients for the Italian Grinder Sliders
Each ingredient in this dish plays an essential role in flavor and texture. Here’s what you’ll need:
12 pieces slider buns (preferably soft and fresh): The perfect base that holds all the delicious fillings.
4 ounces salami (thinly sliced): Adds a rich, savory depth with its bold flavor.
4 ounces ham (thinly sliced): Brings a mild sweetness and tender texture to balance the meats.
4 ounces capicola (thinly sliced): Infuses a spicy kick that elevates the overall taste profile.
4 ounces provolone cheese (sliced): Delivers a creamy, slightly tangy layer that compliments the meats.
1 cup shredded lettuce: Provides a refreshing crunch that lightens each bite.
1 medium tomato (sliced): Adds juiciness and a touch of acidity to brighten the flavors.
1/4 cup banana peppers (sliced): Introduces a zesty heat that enhances the sandwich experience.
1/4 cup olive oil: Serves as the base for the dressing, adding richness and moisture.
2 tablespoons red wine vinegar: Contributes tanginess that balances the savory elements.
1 teaspoon Italian seasoning: Infuses an aromatic blend of herbs for authentic Italian flavor.
1 teaspoon garlic powder: Adds a warm, fragrant note that enhances every component.
1 teaspoon salt: Enhances all flavors, ensuring they shine through in harmony.
1/2 teaspoon black pepper: Provides a subtle warmth that rounds out the seasoning.
- 1/4 cup grated Parmesan cheese (for garnish): Finishes off with a salty, nutty layer of flavor.
Step-by-Step Instructions
I recommend starting with the dressing first, as it allows the flavors to meld while you assemble the sliders, saving you time in the end.
Step 1: In a mixing bowl, whisk together the olive oil, red wine vinegar, Italian seasoning, garlic powder, salt, and black pepper until well combined. This step is crucial as it creates a zesty dressing that will enhance all the flavors in your sliders. I like to let it sit for a few minutes after mixing to allow the spices to infuse into the oil and vinegar thoroughly.
Step 2: Slice the slider buns in half and place the bottom halves on a baking sheet. Make sure to choose soft and fresh buns for the best texture; they should hold up well against all those delicious fillings. A baking sheet lined with parchment paper can make cleanup easier later on.
Step 3: Layer the salami, ham, capicola, provolone cheese, lettuce, tomato, and banana peppers on the bottom halves of the buns. I usually start with the meats for a solid base and then add cheese followed by vegetables for crunch. This layering not only looks appealing but helps distribute flavors evenly throughout each bite.
Step 4: Drizzle the prepared dressing evenly over the toppings. I find that using a small spoon or a squeeze bottle gives better control over how much dressing you’re adding. You want just enough to moisten everything without making it soggy; about one tablespoon per slider usually does the trick.
Step 5: Place the top halves of the buns on each slider. Gently press down to help them adhere slightly to the fillings below; this ensures that they stay intact during baking. If you’re feeling adventurous, you can brush a little extra olive oil on top of each bun for added flavor and an even crispier finish.
Step 6: Preheat your oven to 350°F (175°C). Cover the baking sheet with aluminum foil and bake for 10 minutes. This initial covered bake helps steam the sliders so that all your ingredients heat through without drying out too quickly.
Step 7: Remove the foil and bake for an additional 5 minutes, or until the tops are golden brown. Keep an eye on them during this last stage; you want a nice crispy texture without burning. When they’re golden brown and fragrant, they’re ready to come out!
Step 8: Remove from the oven, sprinkle with grated Parmesan cheese, and serve warm. The melted cheese combined with that crispy top gives these sliders an irresistible finish! I love serving these straight from the oven while they’re still steaming hot—your guests won’t be able to resist!
What to Serve with Italian Grinder Sliders
This dish is already incredibly filling and balanced, but these sides add extra variety and nutrition to round out your meal perfectly.
Italian Pasta Salad: This colorful salad features al dente pasta tossed with cherry tomatoes, cucumbers, olives, and a drizzle of Italian dressing. The bright flavors and chewiness of the pasta complement the savory richness of the sliders while providing an additional 8-10 grams of protein per serving. My kids love this salad at our family gatherings, making it a staple for potlucks alongside sandwiches.
Garlic Parmesan Roasted Broccoli: Tossed in olive oil and garlic, then roasted until crispy, this broccoli side dish brings a crunchy texture that contrasts beautifully with the tender sliders. The garlic echoes the seasoning in the grinder sliders and adds a healthy dose of vitamins C and K, along with fiber. It’s my go-to when I want to sneak in some greens without my kids noticing!
Creamy Avocado Dip: Made by blending ripe avocados with Greek yogurt, lime juice, and spices, this creamy dip delivers healthy fats that enhance meal satisfaction. Its rich texture and mild flavor create a delightful contrast to the zesty sliders while adding an extra 3-4 grams of protein per serving. This is a favorite at our game day gatherings; everyone loves dipping their sliders into it for a flavor boost.
Herbed Quinoa: Fluffy quinoa mixed with fresh parsley, basil, and lemon juice makes for a light yet satisfying side that echoes the Mediterranean flavors of the sliders. With about 8 grams of protein per cup and plenty of fiber, it helps keep you full longer while providing essential nutrients. I often make this ahead during meal prep so we can quickly pair it with various dishes throughout the week.
Storage & Serving Tips

To store your Italian Grinder Sliders for meal prep, place the slider buns in a large airtight container to keep them fresh for up to 4 days. For the meats—salami, ham, and capicola—store them in a separate airtight container to maintain their flavor and texture. The provolone cheese should also be stored separately to prevent it from becoming soggy. Keep the shredded lettuce, sliced tomato, and banana peppers in individual small containers to ensure they remain crisp. Lastly, store the dressing in another airtight container away from the other components.
When reheating, it’s best to warm the slider buns in an oven set at 350°F for about 5–7 minutes until they are soft and warm again. The meats can be reheated in a microwave for 60–90 seconds; just be sure to cover them with a damp paper towel to prevent drying out. Avoid microwaving the slider buns as they can become disappointingly soft and lose their delightful texture. For the vegetables and dressing, simply add them fresh after reheating to preserve their crunch and flavor.
Pro tip: To batch cook this recipe for the week, consider making a double batch on Sunday and portioning it into individual containers. Family members can self-assemble their own sliders by placing all ingredients out for assembly. If you want variety throughout the week, try swapping out the meats with turkey or chicken, or use roasted vegetables for a vegetarian option. To keep your provolone cheese at its best during meal prep storage, always store it separately from the other components until ready to serve!
Conclusion
These Italian Grinder Sliders have become a regular rotation recipe for me, and I find myself making them at least twice a month because they’re not only delicious but also pack 250 calories per serving without sacrificing flavor. The soft and fresh slider buns are what truly elevate these mini sandwiches, allowing the rich combination of Italian meats and zesty dressing to shine through. Give this one a try this week. I promise it’ll become a regular rotation meal in your house too.
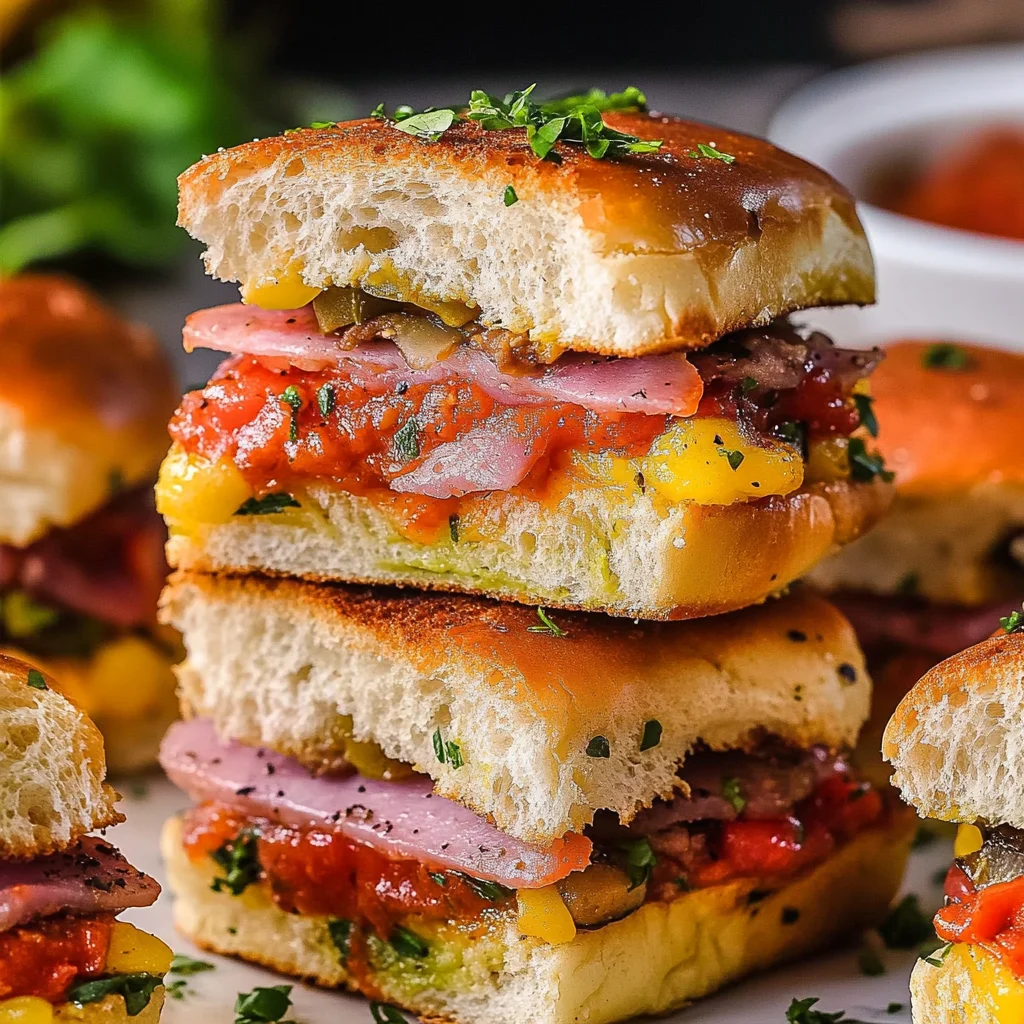
Italian Grinder Sliders
Ingredients
Method
- In a mixing bowl, whisk together olive oil, red wine vinegar, Italian seasoning, garlic powder, salt, and black pepper until well combined.
- Slice the slider buns in half and place the bottom halves on a baking sheet.
- Layer the salami, ham, capicola, provolone cheese, lettuce, tomato, and banana peppers on the bottom halves of the buns.
- Drizzle the prepared dressing evenly over the toppings.
- Place the top halves of the buns on each slider.
- Preheat the oven to 350°F (175°C). Cover the baking sheet with aluminum foil and bake for 10 minutes.
- Remove the foil and bake for an additional 5 minutes, or until the tops are golden brown.
- Remove from the oven, sprinkle with grated Parmesan cheese, and serve warm.

Leave a Comment